
For help on part 3b, leave a comment on this blog post : http://www.vdategames.com/wordpress/?p=195
TUTORIAL 3b : Scenes and animations
Now, you should have at least one character to work with.
The next step in these tutorials is going to be about scenery and how to add your character into a location.
Option 1
The free and most simple way to do this is to just use an image you find online.
Go onto google images and type in something like 'background images bedroom'. You should get a decent selection of images you could use.
Back in tutorial 1, I gave you instructions on how to import a background image. If you've found a background image you like, go ahead and save it to your desktop and try importing it.
The advantages of doing backgrounds like this are that it's cheap and fast.
The disadvantages are that is restrictive if you want more than 1 camera angle from the same room, and it doesn't always look right if you have a cgi character in front of a real life photo. If you want to sell your game, there may also be lots of restrictions on what you can do with the image. You may be able to avoid that last problem however, by searching for something like 'background images kitchen public domain' instead.
Option 2
You can use some of my own backgrounds if you want.
Here's a big pack of backgrounds for you to use, featuring locations from my own games. Use them if you wish, even in your finished games. There is a small txt file of permissions for further details.
Option 3
The third option is to use an actually model to create the backgrounds.
Scene models can be bought from the same places you buy the characters and outfits.
Here's a link to hundreds of scene models if you're able to pay for them : http://www.renderosity.com/mod/bcs/index.php?TopID=268280
As with characters and outfits, you can also find free scenes, though normally of a lower quality.
Free examples :
- http://www.sharecg.com/v/69190/browse/11/Poser/Crown-Street-House
- http://www.sharecg.com/v/28264/browse/11/Poser/Country-House-for-Poser
- http://www.sharecg.com/v/49647/browse/11/Poser/Pond-Scene
Scenes are added to you content library in the same way as everything else. Just merge the runtime with the one on you hard drive, then browse the folder in you daz studio content library.
Scenes are normally listed under either characters or props.
Once you have a scene loaded up, go to file > import and find your character. You should now see them loaded into the scene.
From here, you should be able to experiment with everything you've learned and create some good looking images.
Animation
Specifically, this section will cover how to make those looking GIF animations I mainly use for sex scenes.
The easiest way to do this is to just buy an animation file. Good quality adult animations can be bought from renderotica.com. They work just like pose files, and are added and applied to characters in the same way.
You can also make you own animations.
To do a basic example of this, save whatever you have open right now as a separate scene with a new name. If your scene doesn't include a character, import one. Open you content library to poses.
Make sure daz studio has the Pose & Animate tab open. At the bottom of the screen, you need the tab named timeline open. If you can't see it, click the little arrow above it to unhide it. Finally, if animate 2 is open instead, click the time line tab.
Your daz studio should now look a little like this...
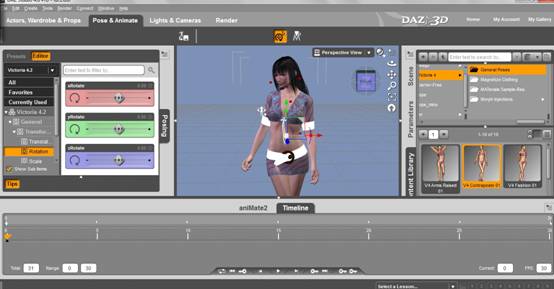
On the timeline, make sure frame 0 is has the orange triangle on it (it probably does already). Now, select a pose and apply it to your character.
Next, move the triangle to frame 15. Load a different pose onto your character.
Next, move the triangle to frame 30 and load the same pose as you did for frame 0.
You just made your first animation. At the bottom of the screen, you should see a play button. Press it and you'll see your character loop between the 2 poses.
From here, you should now have a good idea of how animating your character for other scenarios will work. For instance, for a blowjob animations, you would have your character kneeling. Frame 0 would have them leaning forward, and frame 15 would have them leaning back. The last frame must always use the same pose as the first in order to create a seamless looping GIF.
Note : The reason I used 30 frames is because 30 frames = 1 second. If you want your animations to be longer, that's fine, but get into the habit of animating in multiples of thirty.
Sadly, neither daz studio or poser has the ability to export directly into animated GIF format though, so we now need to export a series of frame for us to use in the next step.
Change to the render tab. Set the image size and render quality you want.
Before you hit render this time however, go to the 'Render to :' section and (if it isn't already) change it to image series rather than still image. Specify, which folder you want to save it to, which file format etc, then hit render.
Rendering here will probably take a little while, so don't be surprised if it takes up to 30 minutes depending on the image you're rendering and the speed of you computer. When your computer is finished, you should have a series of thirty images ready to animate.
Finally, you need to now turn these frames into an animated image. I use adobe photoshop or fireworks, but there is a free software called gimp which can also do the job. Download it here : http://www.gimp.org/
There are many tutorials online regarding how to turn a series of images into a looping GIF, so rather than explaining this section myself, here's a link to a good tutorial : http://www.wikihow.com/Create-an-Animated-GIF-Image-with-GIMP
As you can see, creating animated GIFs is a lot more work than a regular still image. Don't feel that you need lots of them in your game, in fact there are some similar games on the internet which don't use any at all.
Homework : Have some fun! You should now have pretty much everything you need to create images for your game, so go ahead and make some.
Next time, we'll be going through the programming aspect of these games and talking about how to create html files.