For help on part 3a, leave a comment on this blog post : http://www.vdategames.com/wordpress/?p=192
TUTORIAL 3a : CHARACTERS
We've already gone over the basics of what makes an image for these games. Now it's time to go through all those other details that make a character.
If you want free characters to apply to your V4 or V3 base, you can get them from http://www.sharecg.com/
Here's an example of a V4 figure you can use for this tutorial : http://www.sharecg.com/v/40142/related/11/Poser/alta_V4Riho
If you have the V4 base, create a free account with sharecg and download it.
If you have the V3 base, here's an example for you : http://www.sharecg.com/v/24573/browse/11/Poser/Sandra-for-V3
If you're able to pay, go ahead and buy/download the character from homework 2 in the last tutorial. Generally speaking, the charactres from renderosity are of a higher quality. As with most things, you get what you pay for.
Open daz studio (or poser) and follow the steps from tutorial one where you loaded the V4 or V3 base into an empty scene.
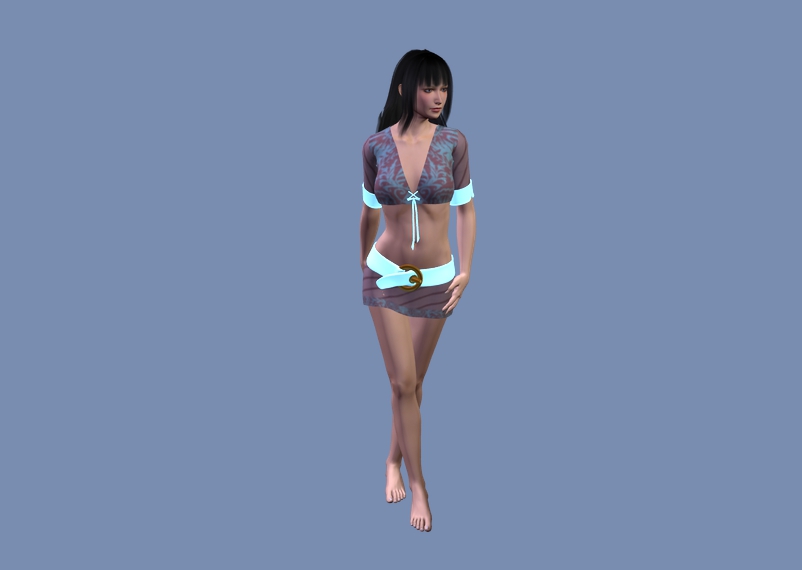
For this tutorial, I'll be using the alta_rhio character for V4 (the free one), but it should roughly work with any character.
Now download it if you haven't and open the zip file. As we did in tutorial 1, we are going to merge the runtime folder in the zip file with the one on your computer.
In daz studio, look through your content library and find the folder for her. Characters are always listed as a 'pose'. In alta_rhio's case, she can be found under Poser formats > My library > Pose > alongtimeago > alta_V4rhio_Free. If you select the last directory, you should now see all the character options you can add to your base.
Double click them to add them to your character. Also, make sure you have your base selected (just click on it) for them to be applied.
Note : If you don't see it, you may need to refresh your content library. Right click it and select refresh.
Take some time and play around with the different things you can now do with your character. Here's a quick list of everything you should now see :
- MATs. MAT is short for materials, which are the textures you can apply, such as skin or make up. The main skin material is normal listed as 'skin MAT' or ' default MAT'.
- Morphs. Morphs will alter the shape of the base to give them a different look. There are normally seperate morphs for the head and body. There is normally an option to remove them too.
Remember, you don't have to use all parts of the character if you don't want to. Feel free to use the skin texture without the head morph if you think it looks better.
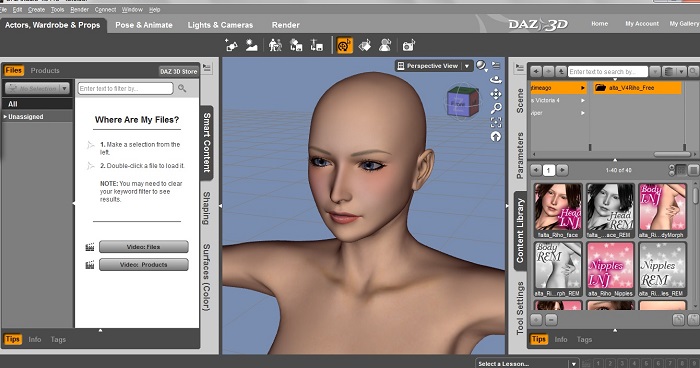
- Make up options. This does what you'd expect. Use these to change the way the characters make up looks.
- Eye colours. Choose different eye colours for your character.
Different characters will always have different things to check out, so always make sure to look through them all until you're happy.
Hair
Odds are you'll want hair for your characters.
If you have some money, look through these until you find something you like, then buy and download it :
- http://www.daz3d.com/hair?compat_figures=27
- http://www.renderosity.com/mod/bcs/index.php?TopID=268277.268302
Note : always make sure the hair is compatible with your base figure! Some will only work with the V4 or V3 etc.
Here's a free one I will be using for the V4 base : http://www.sharecg.com/v/65755/browse/11/Poser/HMHM-hair-and-MGHM-hair-for-V4-A4
Here's a one for the V3 base if you need it :
http://www.sharecg.com/v/51011/browse/11/Poser/Kalomi-Hair-for-V3-and-V4
Download the hair, open the zip, and merge the runtime with your own.
For HMHM hair, look through your content library again. You will find it under Poser formats > My library > Figures > Red_viper > hmhm_hair.
Double click the item that says hmhmhair and it should be added to your character.
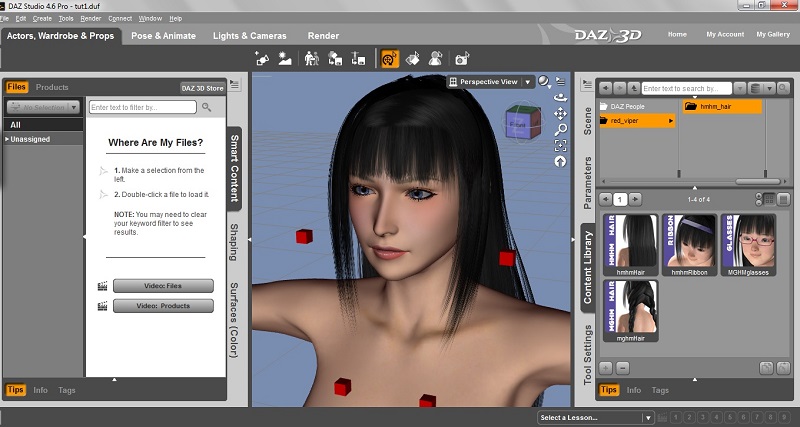
Important : Now, make sure your hair is selected. In the top left, click Edit > Figure > fit to...
Make sure the selectable bar says Victoria v.2 (or something similar), then click accept. With this step, your hair will now move with the character when you start to pose her.
Hair hmhm comes with a few other options, such as glasses. Add these if you want, but remember to fit them to the base as well.
Clothes
Now we need some clothes. Again, you can buy an outfit, or I will give a free option.
If you want to buy, here's where to look :
- http://www.daz3d.com/clothing-accessories?compat_figures=27
or
- http://www.renderosity.com/mod/bcs/index.php?TopID=268275.268291.269892
Remember to make sure it's compatible with your base figure!
Here's a free outfit I'll be using for the tutotial : http://www.sharecg.com/v/30253/browse/5/3D-Model/Isotope-Outfit-for-V4
Here's a V3 option if you need it :
http://www.sharecg.com/v/63493/browse/11/Poser/Beowulf-for-Victoria-3
Download the zip, open it and merge the runtime with your own.
Outfits are normally found under figures. You should be able to find this one under Poser formats > Mylibrary > Figures > KB_isotope.
Note : If you're using the isotope outfit, it looks like the geometry files and named wrong. If you get daz studio saying it can't locate the file, say that you want to find it. For the skirt, locate a file named IsotopeTop.obj and for the skirt, look for IsotopeSkirt.obj. Both should be in your runtime folders. Normally, you wouldn't have to look for these though.
Double click the skirt and it should be loaded into the scene. Like the hair, go to Edit > figure > fit to... (with the skirt selected) to attach it to your character.
Do the same with your top.
Often with outfits, you will also get a few options to change it's colours.
Fot the isotope outfit, look under Poser format > mylibrary > poses > KB_isotope and KB_isotope_mix. Pick one you like, or stick with the defaults. Remember to select the relevent part of the outfit before applying a new look, other wise it won't show up.
If you want shoes too, you now should have enough information to find and add them to your character yourself by this point.
If you haven't already, now is a good time to save your scene.
Poses
You should already have some poses from tutorial 1.
If you want more poses, you can find them in the same way you would outfits or characters.
For free ones, just go on sharecg and search for V4 poses (or V3 if it's your base). Merge the runtimes with your own, then find them in your content library.
Here's an example to play with : http://www.sharecg.com/v/59908/browse/11/Poser/V4-Poses-02
When applying a pose to your characters, make sure the character is selected rather than the outfit.
When applying a pose, you may notice that the outfit doesn't quite fit properly. To move it into position, select the clothing under the scene tab. Next, click the small arrow next to the name to expand the item into it's parts. If for instance, the skirt isn't fitting properly, you would select the thigh. With the part selected, click the parameters tab. Change twist, bend, or side-to-side to alter it's position.
You can also do this with any part of the character model as well. If, for instance, you click her neck, you can use the parameters to change the direction she is looking.
Lights
As with other parts of the scene, you can download sets of lights to apply to your character.
Here's a free example to play with : http://www.sharecg.com/v/58879/browse/11/Poser/Romantic-Lights-Poser
If you are buying from renderosity, a lot of the time, you may find you get free light sets with your purchases. So if you bought one earlier, have a look through the content library for them.
If you downloaded the free lights above, open the zip file and merge it with the lights folder within your runtime.
You can find your light sets under Poser formats > mylibrary > lights
Apply a pose you like, then a light set you like to your character.
Rendering
In daz studio, click the big render tag.
Before we hit render this time, let's take a look at the diferent render options.
To the left of the screen next to the green render button, you will see numbers 1 to 4 with a silder. Move the slider to a different position to get a different level of detail.
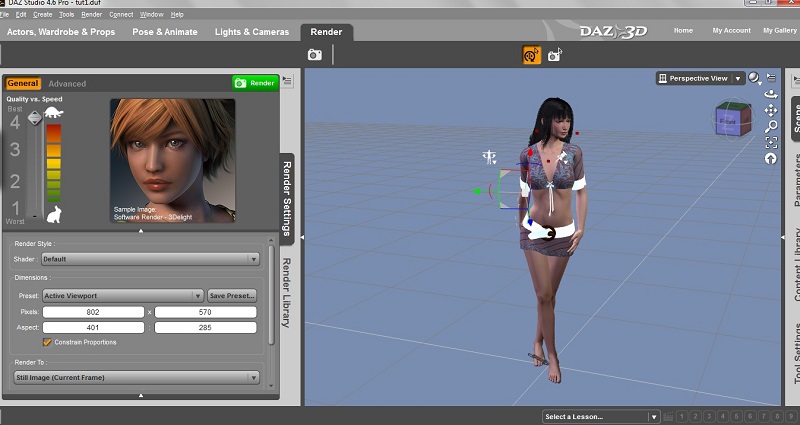
Setting it to 1 will create a rendered image quicker, but will not look as good. Setting it to 4 will create a higher quality image, but it will take a little longer to render.
Since there isn't much in the scene, you probably won't notice a difference in speed, but scenes with more items or characters may end up taking some time.
When you're done, make sure you save your scene ready for the next tutorial.
Summary
Today, we've gone through : how to add characters to your base, then hair, outfits and lights.
Since this took a little longer than I thought it would, next week I'll be doing another images tutorial, in which I'll cover creating scenes and animations.
Homework : Using what you've learned, create a second female character for you game.