
For help on part 4b, leave a comment on this blog post : http://www.vdategames.com/wordpress/?p=195
TUTORIAL 4b : Coding part 2
By now you should be familiar with the main coding elements of what makes a game. This tutorial is going to be a list of everything else you might need.
Game Titles
Each page of your game comes with a title. If when playing some of the games here, you ever look to the top of the page, you may have noticed that the name of the game is written at the top of your browser, possibly in the current tab.
To make this happen, using kompozer, open 1default.html. Around line 4, you should see the game's name displayed between the 2 'title's.
Change it to whatever the name of your game is, then save it.
Now every time you create a page using 1default.html, the title will be displayed.
Checks
This will cover how to make the game go one direction or another based on information saved to it.
For instance, you might your date to remove her clothes. If her 'lust' (or similar) if above 80, she will say yes, and if it's below 80 she will say no.
To make you game perform this check, we use the file 1bedcheck.html. Open it in kompozer and switch to Source view.
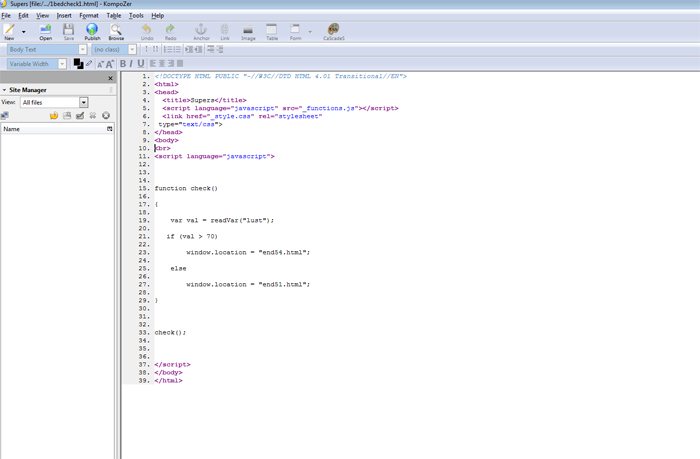
On line 21, you should see 'var val = readVar("lust");'.
Change the word lust to whatever variable you want to check (lust, inf, metx etc).
The number 70 on line 21 is the amount it checks for. In this case, it is seeing if lust is currently at 70. Change it to another number if you need to.
Further down, you should see two html file names written. The higher one (line 23) is always the positive reponse, and the lower one (line 27) is always negative.
So, if lust (or whatever variable you are checking) is more than 70, it will take you to the page in line 23. If it is too low, it will take you to the page in line 27.
Change the page numbers to what you need them to be.
Now, save 1bedcheck.html under a new name.
To have the game make the check you just made, just make sure a dialog response in one of your pages has the name it as the page it is linked to (See Creating a page in the last tutorial).
Note : The check you just made is checking for a value over 70. This does not include 70. ie, if lust was 70, the check would have found it not high enough. If you want the check to include 70, always make the value 69.
Checks can also be used to checking any value, such as if you bought a certain outfit at the store. In that case, you would probably just have the variable set to 1. In this case you would therefore write the value to be checked as 0.
Hotspots
Hotspots at the links to other pages that appear on the images (for instance 'kiss her').
If you don't want to use hotspots in your game, that's fine. It'll still work without them.
Rather than make one myself, here is a good tutorial explaining how to use gimp to create them : http://www.makeuseof.com/tag/create-image-map-gimp/
Note : In stage 2 of the tutorial, don't write a website's URL as it says. Just write the name of the page you want the hotspot to link to, such as 'park1.html'.
Inventory
In the bottom left of the screen, you might want some items to appear in your character's inventory.
If you want something to appear there, you will first have to create a small image for it. It will need to be 40 x 45 pixels. You can use anything you want for the picture. Don't feel that you need to use something created with daz studio or poser.
When you have made it, give it a name you'll remember and place it in the folder called buttonsetc.
Next, using notepad (you should have it on your computer somewhere), open one of the inventory files. These are the one's named 'inventory1.js' to 'inventory4.js'.
I recommend 'inventory2.js' for this example.
On line 7 you should see 'buttonsetc/cam.jpg'. Change the word cam to the name of the image you just created.
On line 4, find the word inv. This is the variable that is checked on every page for whether or not to show your picture rather than a blank white one.
It it set the same way as all the variables we have been using.
First, you will need to create a variable in the file helloworld.html. Make the variable's value 0.
Next, on a relevant page of your game use what you learned in the last tutorial to increase the value of the variable to 1.
Finally, change the word inv inside ' inventory2.js' to whatever the name of your variable is, then save it.
Now, whenever you increase the variable value to 1 during the game, your small image will appear in the bottom left.
You can have up to four different types of items in your inventory using this template. Just use a different one of the four named ' inventory1.js' to ' inventory4.js'.
Note : If you open ' inventory1.js', you will notice that there are three different small images which can be displayed. This inventory slot is a little different, but basically works the same. The first image is what is displayed if the variables value is 1, the second is displayed if it is 2, and the third is displayed if it is three.
Random
Sometimes you might want a link to take you to a random page.
To do this, use the page named 1random.html. Open it in kompozer.
On line 50, you will see a line of code which includes something like "nclub14.html". Change this to one of the pages you want the player randomly taken to.
Below it on line 52, change the page to the second possible place you want the player to be taken to.
If you want more possible pages, copy line 52 and paste it underneath and change the page in it to whatever else you need.
Whenever you add a new line though, change the number following 'arLinks' to the next highest one. So, the third random link should begin with 'arLinks[3]', the forth with 'arLinks[4]' etc.
When you're done, save 1random.html under a new name. Link to it's name via a dialog response or hotspot to make it occur.
Homework
That's all for the Coding tutorials. If there's anything I've missed, I'll try and add it to the next and final tutorial.
If there's homework for this week, it'll simply be to go and experiment with everything you've learned and have some fun.