
For help on part 3b, leave a comment on this blog post : http://www.vdategames.com/wordpress/?p=195
TUTORIAL 4a : Coding part 1
This tutorial will mainly go into focusing on the creation and editing of the html files which tell your story and provide your gameplay.
For editing html, I use a software called dreamweaver.
It is a moderately expensive adobe product however, so for this tutorial I will be using something free called kompozer. Go ahead and download it from kompozer.net. There should also be a mac or linux version available if you need it.
As I said in part 1, an html file is basically a 'page' of the game. Every time you click an action over the image or select a dialog response, the page you are on takes you to another page.
This tutorial will therefore concentrate on how to configure an html file so that is works as a page in your game.
Here's a link to a blank template for a game : LINK. Download it, and place it somewhere safe on your computer.
Helloworld
Let’s start with the helloworld.
Open kompozer. With kompozer open, go to file > open file, then find the file named helloworld in the template you just downloaded. It should be under files>gamelrge
At the bottom of the screen, you should see a tab saying Source. Click it.
Your screen should look like this :
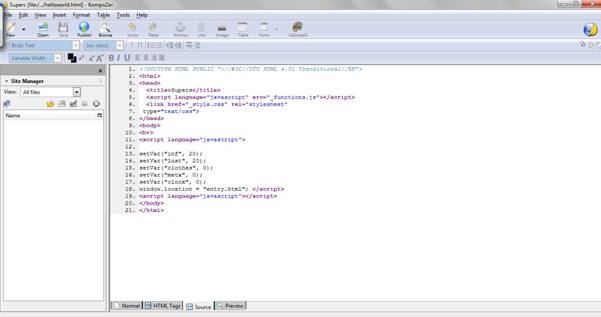
Do you see where it says setVar("inf", 20);?
This is a variable. A variable is an ‘item’ in coding, which you can then assign a value to. In this case, the file is creating a variable called ‘inf’ (short for influence), then giving it a value of 20.
The purpose of the file helloworld is to set the various variables of the game to whatever you want it to be at the start of the game.
Influence is a popular variable in games for describing how much a character likes the player-character. In this case, I’ve set it to 20, as that seems like a good starting point. It means that the player can afford to loose some as opposed to just gaining influence points.
The influence variable is also what you see while playing the game. It’s that bar to the left that has the smiles. The higher the value of influence, the more smiles show in the bar.
If you want it to be, say 30, go ahead. Just replace the 20 with a 30.
The template I’ve provided also comes with a variable called lust.
As with influence, if you want it to be higher or lower, just change it.
Underneath these two variables, you should see some others as well.
Clock defines what time it is on the date. It is currently set to 0, which in this game is 8 pm. Every number equals thirty minutes, so if you want the date to start at 9pm, change the number to a 2. If you want it to start at 8:30 pm, change it to 1 etc.
Clothes is a variable for the game to save which outfits the player has bought. If your date only wears one outfit in your game, feel free to delete this line. If you leave it however it won’t affect gameplay.
Finally, there is the ‘metx’ variable. This is something I use for recording whether a second main character has been met. For instance, if you meet a character then agree to meet them in a nightlcub later, you can set this variable to 1. The game can then check this variable at the nightclub and make them appear there.
If you want to do something like this, change the name to something more relevant like ‘metcrystal’, or whatever your characters name is.
You will probably want to create more variables of your own. Anytime you have something in the game which has to be remembered, such as the amount of money, whether your character has a camera or if you’ve managed to kiss your date yet, just copy one of these lines of code, and paste it into the list.
When you’re done, save helloworld.html.
Creating a page
Do you have some images you’ve already created from former tutorial? Place them in the folder named images so you can use them.If not, you’ll need to create them.
Now, we’re going to create your first few pages.
In kompozer, open the file named 1default.html. Click the source tab at the bottom.
Although the code may look a little intimidating, don’t be scared. Since you already have a template to work from, you only need to change a few things here.
What we’re going to make here are a few examples, so don’t worry if you don’t create your game following this tutorial. The Important thing is that you create examples you can then apply to your own work.#
On the left, you’ll see that all the lines of code are numbered. Go to line 25.
Inside the quotations, you’ll see the words “date dialog 1”. This is what displays at the top of the page, normally your date speaking to the player. Leave the quotation marks, but change the words between them to something else, such as “Hello. There, my name’s Crystal.”
Next, go down to line 91. Find the segment named intro1.jpg. This is the image which is displayed on the page.
In the image folder (in the template), find an image you want to display. Preferably one which makes sense with the dialog you just wrote.
Change intro1 to the name of the Image you want.
Finally, go down to lines 104, 105 and 106.
These are the replies the player can choose. Replace the words “Reply 1” with one of the responses you want.
Do the same for the other two lines.
Now go to File>save as. Save this file as entry.html. This file will already exist, so replace it when prompted.
Entry.html is always the first page that displays in the game.
Next, you will have to think ahead for a moment. Each of the three replies you just wrote, when clicked by the player, will take then to another page of the game.
Again on lines 104, 105 and 106, find the segments that end in html. 104 should currently say act2_1_1.html. You need to change it to something you will create in a moment.
Since we are near the start, let’s call the next page intro1.html. Change it to this.
Just to summarise, we are on page entry.html. When the player clicks the first reply, they will now be taken to page intro1.html.
Change the other two replies to something similar. Try and make one of the replies sound nicer, and one of the other sounds rude.
Note : If you want, two or all three replies can lead to the same next page. Just make sure it makes sense.
Finally, I’m going to explain how to increase and decrease the influence meter.
Copy this line : onclick="varPlus1('inf')"
Going back to lines 104, 105 and 106, find the reply which you wrote to sound nicer.
Add the code from above to the line, between the ‘a’ and the ‘href’.
It should look like this : <td><a onclick="varPlus1('inf')" href="act2_1_1.html">"Reply 1."</a></td>
Now, when the player selects this reply, the influence will go up by 1. If you want it to be a bit more, Change the Plus1 part to Plus2, or Plus 3 etc.
Now find the reply you wrote to sound rude.
Do the same as above with the line of code which includes this reply.
Next, change the word Plus to Minus. When the player chooses this reply, the influence meter will go down. As above, you can change it to Minus2 or Minus3 etc.
Homework
Your homework is to create the next three pages, one for each reply. Remember to name them whatever you wrote before html in lines 104, 105 and 106.
If you want to try playing what you’ve make today, open helloworld.html with your internet browser.
Next time we’ll go into slightly more advanced part of coding.